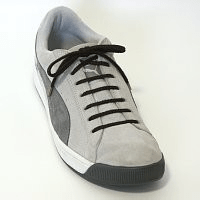
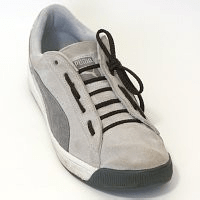
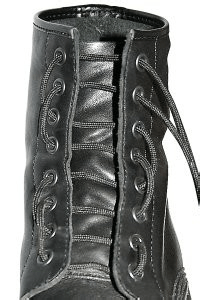
Different ways to lace up sneakers
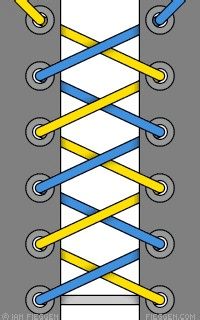
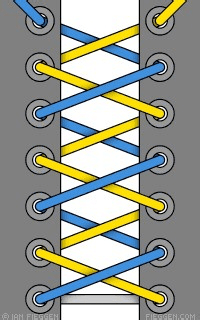
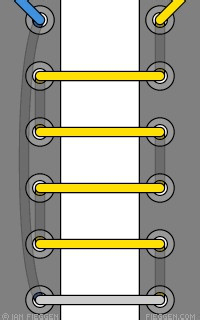
A criss-cross shoelace
Shoelace technique:
- The lace is run directly at the bottom (grey part). While appearing through the holes at the bottom at both ends.
2. Cross each other’s ends and then appear under the eyelet hole according to both sides of the fed.
3. Repeat step (2) until both ends reach the peak hole.
Note: crisscross crossing is also a comfortable preferred lacing method, mainly because the lacing crossing occurs at the gap between the two sides of the shoe, so there is no pressure on the foot.
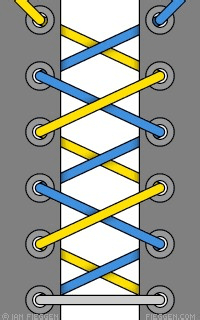
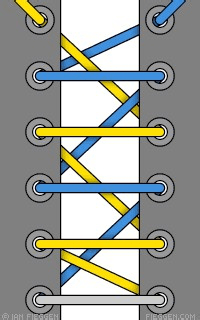
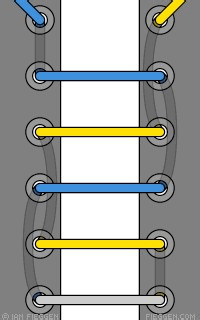
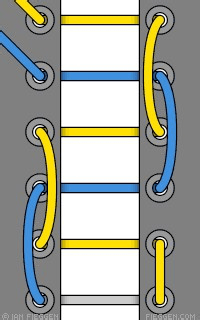
Pair according to shoelace
This method can reduce friction, make shoelace easy to tighten and relax, plus reduce wear.
Slip between shoelaces for backup. There are two variations: one hole for even Numbers, and odd holes for other Numbers. Shoelace technique 1 (even-numbered hole pair) :
- The lace is run directly at the bottom (the grey part) and the fed ends are perforated through both the bottom.
- The ends cross (inside) and appear through the eyelet hole.
- Both ends cross (outer) and fed through the eyelet hole under the shoe.
- Repeat steps (2) (3), alternating between crossing or crossing until both ends reach the hole at the top.
Shoelace technique 2 (odd hole pairs)
- The lace is run directly at the bottom (grey part), while appearing through the holes at the bottom at both ends.
- Both ends cross (outer) and fed through the eyelet hole under the shoe.
- The ends cross (inside) and appear through the eyelet hole.
- Repeat steps (2) (3) across or across the hole until both ends reach the top alternately.
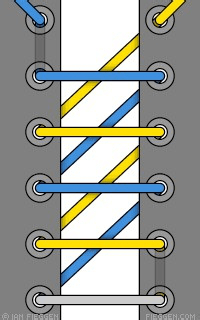
Straight (European) shoelaces are sometimes referred to simply as “ladder shoelaces.
run straight across the outside and diagonally on the inside.
Shoelace technique:
- The lace is run directly at the bottom (the grey part) and the fed ends are perforated through both the bottom.
- (yellow), the bottom is crossed diagonally inside and appears through the next hole in the shoe, then continues straight across the outside is fed through the hole on the other side.
- The left (blue) is exactly across the diagonal in the inside, at a steep Angle, jumping past a hole to reveal the shoe’s future hole. And then continuing straight across the outside, is the fed going through the hole on the other side.
- Repeat step (3) at the end of each turn, each run inside and straight across the outside, diagonal ends, until the top hole is reached. Features: neat top messy lower part.
Straight (bar) shoelaces are often referred to as “fashion lacing” or “Lydiard shoelaces”
Shoelace technique:
- Straight lace runs at the bottom (grey section), divided into two holes at the bottom of the fed at both ends.
- One end of the lace (yellow end) runs straight up to the right, appearing straight across the second set of holes.
- Both ends are now straight up running left, each jump before the new two eye holes higher holes.
- Continue running the entire end of the shoe, then straighten both eyelets once until one end reaches the top.
- At the other end, then run straight across the last set of second buttonholes, then straight up to the top.
Straight (simple) shoelace this is a simplified variation of straight (bar) shoelace running one end directly from the bottom top, while the other end steps through the hole.
Shoelace technique:
- Straight lace runs at the bottom (grey section), divided into two holes at the bottom of the fed at both ends.
- The end of the fed lace (the blue end) is a straight line up to the left, and appears to the upper left of the hole.
- The other end (yellow end) runs straight up to the right, appearing and passing through the second set of holes straight.
- The same end (yellow end) works the way and spans the remaining holes back and forth.
Hiking shoelace/shoelace bike
Shoelace technique:
- The lace is run directly at the bottom (the grey part) and appears through two holes at the bottom.
- One end of the lace (yellow end) runs, straight up to the right, is fed and runs straight through the hole of the second set.
- Both ends are now straight up running left, each skipping a hole, the first two eye holes feeding higher.
- Continue running the entire shoe at both ends and then straighten both eye holes once.
- At the top of the shoe, the LACES end up on the same side, tying the LACES knot at this point.
The sawtooth lace
Shoelace technique:
- The lace is run directly at the bottom (the grey part) and the fed ends are perforated through both the bottom.
- (yellow), the bottom is straight up the inside running and appears through the next hole in the shoe, then continues straight across the outside, is fed through the left opposite hole.
- The left (blue) end crosses the diagonal inside, jumps over a hole, and the right hole appears through the future. And then continuing straight across the outside, is the fed going through the left opposite keyhole.
- Repeat step (3) at the end of each turn, each run inside and diagonally straight across the outside, one end (yellow). Until the hole in the upper right corner is reached.
- The other end (blue) then runs up straight in the hole appearing in the upper left corner.
Shoeshine shoelaces are sometimes called “factory lacing” or “single-screw shoelaces”
Often appear in shoe stores. One end runs from bottom to top, while the other end goes through the perforated zigzags. Two changes are shown: one is the long diagonal section, with long straight lines, etc.
Shoelace technique 1 (long diagonal section) :
- The lace is run directly at the bottom (the grey part) and the fed ends are perforated through both the bottom.
- The left (blue) end crosses the diagonal of the shoe inside all the ways and appears through the hole in the upper right corner.
- (Yellow), the bottom is crossed diagonally inside and appears through the left shoe under a hole. Then continues straight across the outside, is fed through the right opposite hole.
Repeat step (3) with the same purpose each time running the inside and diagonal straight across the outside. Until it reaches the upper left corner of the keyhole.
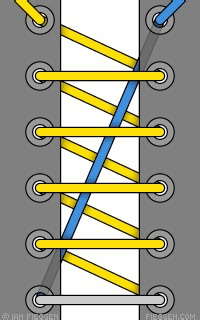
Shoelace technique 2 (line length) :
- The lace is run directly at the bottom (the grey part) and the fed ends are perforated through both the bottom.
- The left (blue) end runs straight up all the way up the top of the shoe. And through the top left hole.
- (Yellow), the bottom is crossed diagonally inside. And appears through the left shoe under a hole. Then continues straight across the outside, is fed through the right opposite hole.
- Repeat step (3) with the same purpose each time running the inside and diagonal straight across the outside. Until it reaches the top of the shoe from the second row.
- The correct (yellow) end runs straight and appears through the hole in the upper right corner.